1. Introduction
Ever spend hours tweaking EQs and still end up with a mix that sounds muddy, harsh, or just… off? You’re not alone. Every home studio producer has hit that wall—frustrated by endless guesswork and second-guessing every frequency move. But what if there was a simple tool to make those decisions clearer and faster?
Enter the frequency chart. This cheat sheet is the secret weapon top mixing engineers use to cut through confusion and dial in pro-level mixes—no matter their gear or experience.
By the end of this guide, you’ll know exactly how to use a frequency chart to fix problem areas, highlight your instruments, and get your tracks sounding crisp and professional.
2. What Is a Frequency Chart and Why Does It Matter?
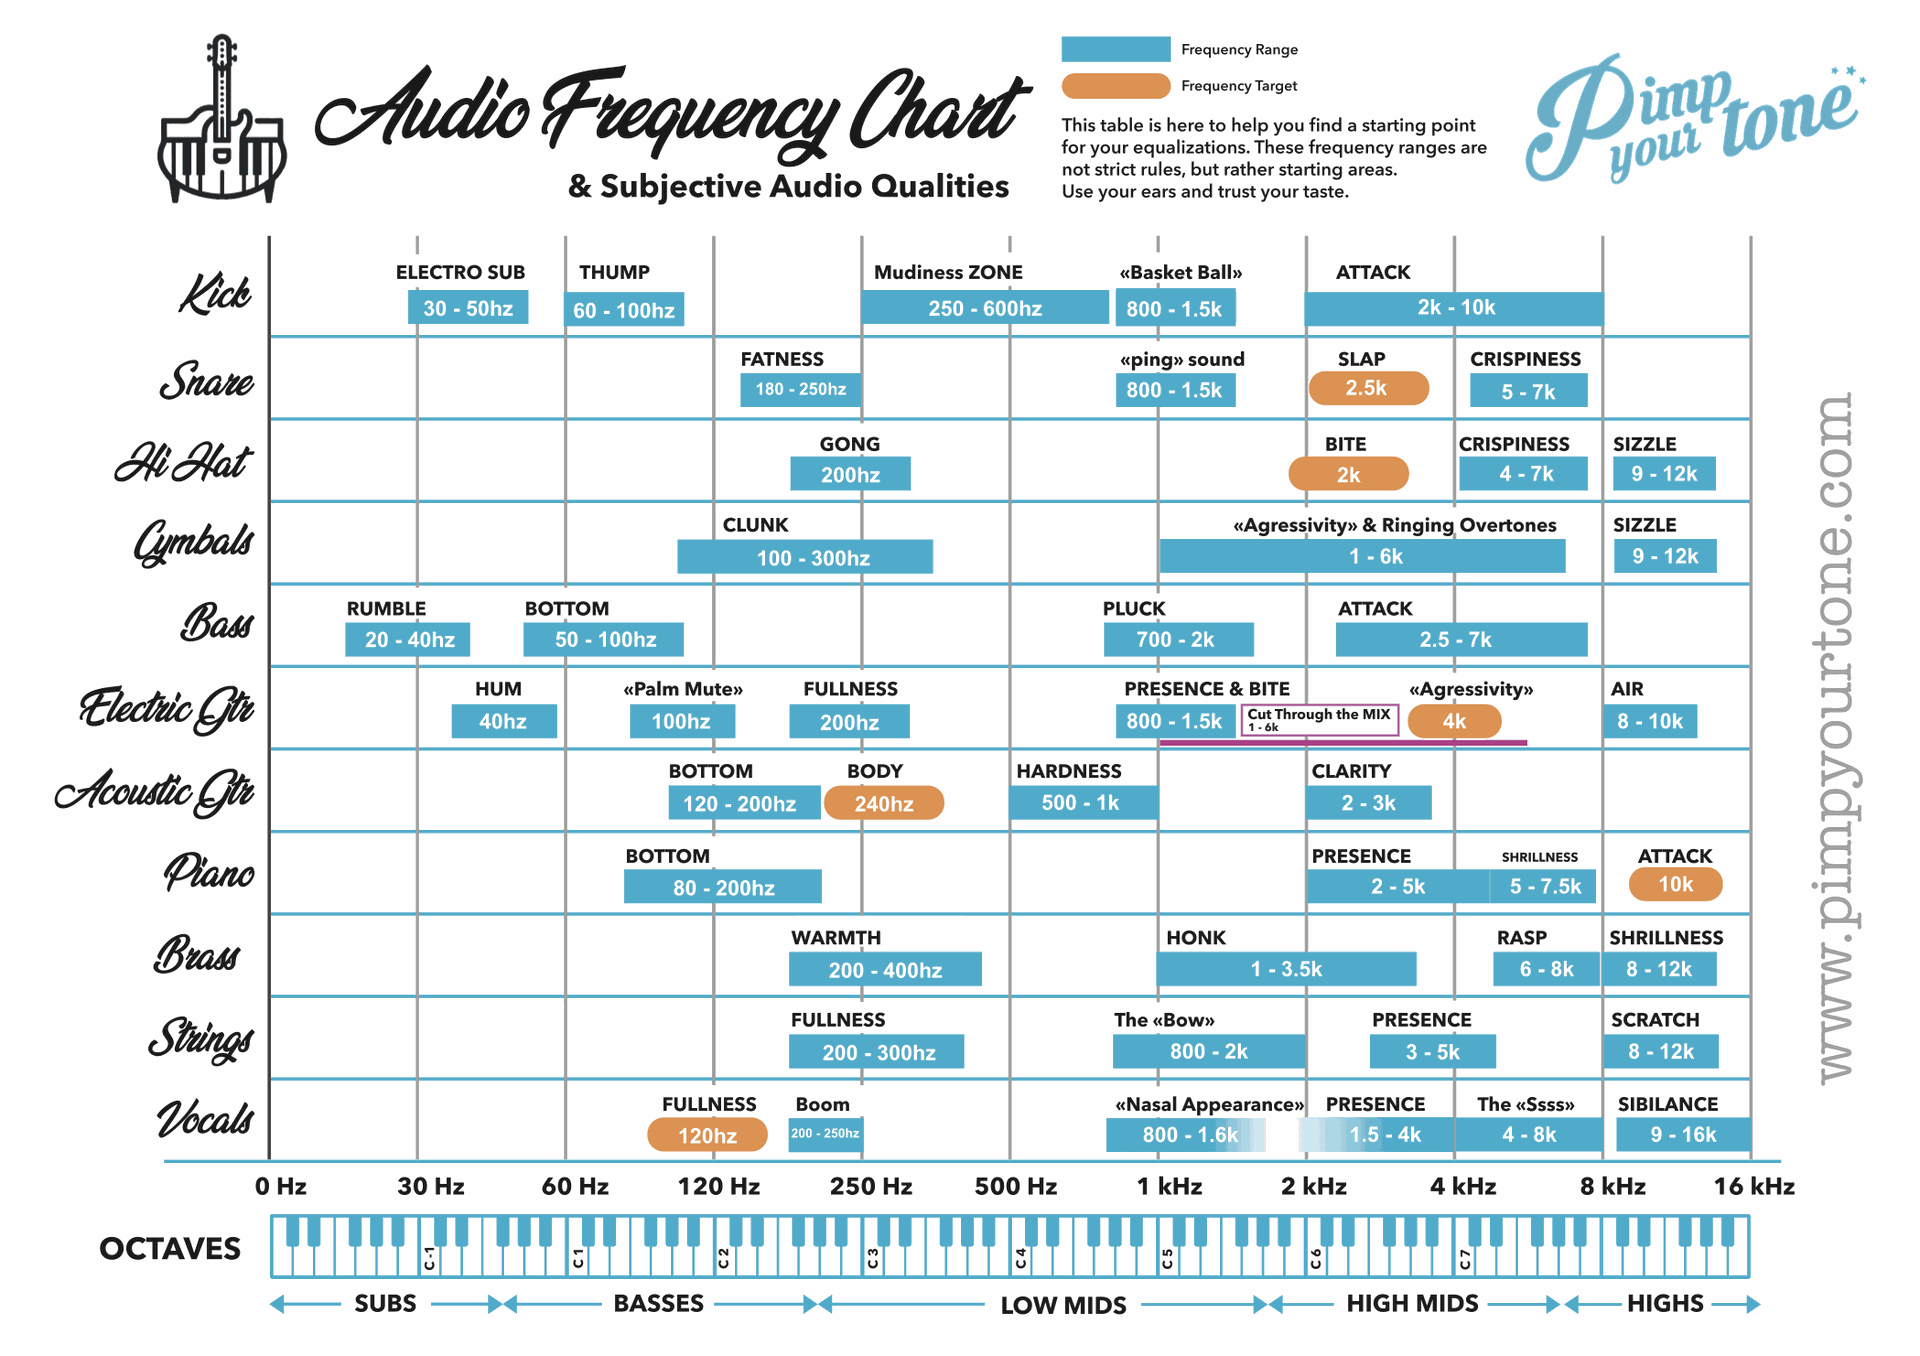
A frequency chart is basically a roadmap for your ears. It shows you where different instruments “live” on the frequency spectrum, from the sub-bass rumble at 20Hz to the airy shimmer at 20kHz.
Why does this matter? Because mixing isn’t just about making things louder or softer—it’s about carving out space so every sound has its own place.
Pros rely on frequency charts to:
- Quickly spot where instruments overlap (hello, muddy mixes!)
- Target problem frequencies (goodbye, harsh vocals!)
- Make intentional EQ moves that enhance, not destroy, the vibe
Whether you’re mixing guitars, vocals, or a full band, a frequency chart is your shortcut to clarity.
3. The Basics: Understanding Frequency Ranges
Let’s break down the frequency spectrum (20Hz–20kHz) and where common instruments sit:
- Sub-bass (20–60Hz): The “feel it in your chest” zone. Kick drums, bass drops.
- Bass (60–250Hz): Body and warmth. Bass guitar, low end of the piano, some drum punch.
- Low Mids (250–500Hz): Fullness, but also muddiness. Guitars, toms, vocals’ chest.
- Mids (500Hz–2kHz): Definition and presence. Guitars, snare, vocals’ body.
- Upper Mids (2–6kHz): Attack, bite, clarity. Vocals’ intelligibility, pick attack on guitars.
- Highs (6–20kHz): Air, sparkle, sizzle. Cymbals, synths, reverb tails.
Instrument Hotspots:
- Electric Guitar: 80Hz (body) – 5kHz (bite)
- Bass Guitar: 40Hz (sub) – 1kHz (growl)
- Vocals: 120Hz (chest) – 10kHz (air)
- Drums: Kick (60–100Hz), Snare (150–250Hz, 2–5kHz), Cymbals (8–18kHz)
- Synths: All over—shape as needed!
A frequency chart puts all this at your fingertips, so you’re not mixing blind.
4. Step-by-Step: Using a Frequency Chart in Your Mix
Step 1: Identify Problem Areas
Listen for issues—muddy low end, harsh highs, boxy mids. Trust your ears and jot down what stands out.
Step 2: Reference the Chart
Check your frequency chart to see which instruments or ranges might be clashing. For example, if your mix feels muddy, look at the 200–400Hz range—are your guitars and bass fighting for space?
Step 3: Apply EQ Cuts/Boosts with Intention
Instead of random tweaks, use the chart to guide your EQ moves. Cut a little around 300Hz on guitars to clear space for vocals, or boost 2kHz for more vocal presence.
Step 4: Compare Before/After
Always A/B your changes. Did your EQ move actually solve the problem? Is the mix clearer, or did something important get lost?
Pro tip: Less is more. Small, targeted EQ moves add up to a big difference.
5. Pro Tips from Mixing Engineers
Here are a few quick wins straight from the pros (and my eBook):
- “Always sweep before you cut.” Move a narrow EQ band across the spectrum to find the exact frequency that’s bothering you—then cut.
- “Don’t EQ in solo.” Always EQ instruments in context with the mix. What sounds great soloed might disappear in the full track.
- “Subtractive EQ is your friend.” Cutting problem frequencies is often more effective than boosting.
- Real-World Example:
If your electric guitar sounds harsh, sweep between 2–4kHz. Find the nastiest spot and cut a bit—watch the harshness vanish without killing the energy.
6. Free Download: Basic Frequency Chart
Want to make this process even easier? I’ve put together a simple, printable frequency chart—branded for your studio wall or DAW desktop.
[Download the free chart PDF here]
If you want to go deeper, grab my eBook, “The Sound Sculptor’s Notebook,” packed with advanced mixing tips, real-world scenarios, and frequency cheat sheets for every instrument.
7. Conclusion
Mixing gets a whole lot easier when you have a frequency chart as your guide. No more endless guesswork—just faster decisions, cleaner mixes, and more creative headspace.
Ready to take your mixes to the next level?
Download The Sound Sculptor’s Notebook for the full guide, expert strategies, and the confidence to sculpt your own signature sound.
Want more tips and exclusive offers?
Sign up for our newsletter and get 10% off your first order!